nginx(发音为“engine X”)是一款高性能的、轻量级的Web服务器软件,同时也是一款反向代理服务器和负载均衡器。nginx的主要优点包括高性能、低资源占用、可靠性和灵活性。它已经成为一个广泛使用的Web服务器和反向代理服务器。nginx 1.17开始,HTTP/3(QUIC)的支持已经被引入,但需要在编译时启用。
本操作指南基于Debian 11/12操作系统环境下,通过源码编译安装nginx和php,并通过acme.sh签发免费证书开启HTTP/2和HTTP/3服务。
本操作指南基于Debian 11/12操作系统环境下,通过源码编译安装nginx和php,并通过acme.sh签发免费证书开启HTTP/2和HTTP/3服务。
切换到root超级用户权限,并更新包列表,安装所有可用更新,包括新内核
sudo su
sudo apt-get update && apt-get -y dist-upgrade
一、安装nginx
下载最新稳定版的nginx,官网地址为:https://nginx.org/en/download.html,下载当前稳定版源码(Stable version):
wget https://nginx.org/download/nginx-1.26.1.tar.gz 安装nginx相关依赖库
apt-get install -y gcc libxml2 libxml2-dev libxslt1-dev openssl libssl-dev \
 build-essential libtool libpcre3 libpcre3-dev zlib1g-dev libgeoip-dev \
 libgoogle-perftools-dev libperl-dev libgd-dev google-perftools git g++ \
 make automake
创建nginx运行的用户组和用户
/usr/sbin/groupadd -f nginx
/usr/sbin/useradd nginx -M -s /sbin/nologin -g nginx
下载Nginx Fancy Index模块,用于美化index目录,官网地址:https://github.com/aperezdc/ngx-fancyindex
#开始下载Fancy Index模块
git clone https://github.com/aperezdc/ngx-fancyindex.git ngx_fancyindex
开始编译安装:
#解压缩:
tar -zxvf nginx-1.26.1.tar.gz
#进入解压目录:
cd nginx-1.26.1

# 配置编译选项:
# --with-http_v2_module 启用HTTP/2模块
# --with-http_v3_module 启用HTTP/3模块
./configure --user=nginx \
--group=nginx \
--prefix=/usr/local/nginx \
--add-module=../ngx_fancyindex \
--with-pcre \
--with-http_ssl_module \
--with-http_dav_module \
--with-http_flv_module \
--with-http_addition_module \
--with-http_mp4_module \
--with-http_gunzip_module \
--with-http_sub_module \
--with-http_geoip_module \
--with-http_gzip_static_module \
--with-http_random_index_module \
--with-http_secure_link_module \
--with-http_stub_status_module \
--with-http_realip_module \
--with-http_auth_request_module \
--with-http_xslt_module \
--with-http_image_filter_module \
--with-http_slice_module \
--with-http_v2_module \
--with-http_v3_module \
--with-threads \
--with-stream \
--with-stream_ssl_module \
--with-stream_ssl_preread_module \
--with-stream_realip_module \
--with-mail \
--with-mail_ssl_module \
--with-file-aio

# 编译并安装
make && make install
配置、检查、启动、重启、停止 nginx服务
#配置自动启动服务
vi /lib/systemd/system/nginx.service
#输入下面的内容
[Unit]
Description=The Nginx service
After=syslog.target network.target remote-fs.target nss-lookup.target

[Service]
Type=forking
PIDFile=/usr/local/nginx/logs/nginx.pid
ExecStartPre=/usr/local/nginx/sbin/nginx -t
ExecStart=/usr/local/nginx/sbin/nginx
ExecReload=/usr/local/nginx/sbin/nginx -s reload
ExecStop=/bin/kill -s QUIT $MAINPID
PrivateTmp=true

[Install]
WantedBy=multi-user.target

#刷新配置system目录
systemctl daemon-reload
#开启nginx开机自启动
systemctl enable nginx.service
#启动nginx服务
sudo systemctl start nginx.service
#停止nginx开机自启动
systemctl disable nginx.service
#停止nginx服务
sudo systemctl stop nginx.service
#重启nginx服务
sudo systemctl restart nginx.service
#查看服务当前状态
sudo systemctl status nginx.service
#查看所有已启动的服务
sudo systemctl list-units --type=service
#查看是否正确启动
sudo systemctl list-unit-files |grep nginx

#解决环境问题,可以在任意目录下执行nginx命令,如: nginx -v
ln -s /usr/local/nginx/sbin/nginx /usr/sbin/nginx
ln -s /usr/local/nginx/conf/ /etc/nginx

#查看nginx状态
nginx -t
#重新载入配置文件
nginx -s reload
#重启nginx
nginx -s reload
#停止nginx
nginx -s stop
二、安装PHP
下载PHP,PHP官网地址为:https://www.php.net/downloads,下载当前稳定版源码(Current Stable):
wget https://www.php.net/distributions/php-8.3.9.tar.gz 安装php相关依赖库
apt-get install -y gcc make openssl libbz2-dev libxml2-dev libjpeg-dev \
 libpng-dev libfreetype6-dev libzip-dev curl libssl-dev \
  libcurl4-openssl-dev libsqlite3-dev libonig-dev libkrb5-dev libicu-dev
开始编译安装:
#解压缩:
tar -zxvf php-8.3.9.tar.gz
#进入解压目录:
cd php-8.3.9

# 配置编译选项:
./configure --prefix=/usr/local/php \
--with-config-file-path=/usr/local/php/etc \
--with-config-file-scan-dir=/usr/local/php/etc/php.d  \
--with-mysqli \
--with-pdo-mysql \
--with-fpm-user=nginx \
--with-fpm-group=nginx \
--with-kerberos \
--with-iconv \
--with-zlib \
--with-mhash \
--without-pear \
--with-gettext \
--with-curl \
--with-openssl \
--with-freetype \
--enable-intl \
--enable-gd \
--enable-mbregex \
--enable-mbstring \
--enable-fpm \
--enable-pcntl \
--enable-sockets \
--enable-session \
--enable-soap \
--enable-session \
--enable-opcache \
--disable-fileinfo #当服务器内存小1G的时候加上该参数

# 编译并安装
make && make install

# 复制配置文件
cp php.ini-production /usr/local/php/etc/php.ini
cp /usr/local/php/etc/php-fpm.conf.default /usr/local/php/etc/php-fpm.conf
cp /usr/local/php/etc/php-fpm.d/www.conf.default /usr/local/php/etc/php-fpm.d/www.conf

#编辑php.ini的一些参数,
vi /usr/local/php/etc/php.ini
#找到下面几个配置并根据实际调整值
date.timezone = Asia/Shanghai
post_max_size = 128M
upload_max_filesize = 512M
mbstring.internal_encoding = UTF-8
配置、检查、启动、重启、停止 PHP服务
#配置自动启动服务
vi /lib/systemd/system/php-fpm.service
#输入下面的内容
[Unit]
Description=The php service
After=syslog.target network.target remote-fs.target nss-lookup.target

[Service]
Type=forking
ExecStartPre=/usr/local/php/sbin/php-fpm -t
ExecStart=/usr/local/php/sbin/php-fpm
ExecReload=/usr/local/php/sbin/php-fpm -s reload
ExecStop=/bin/kill -s QUIT $MAINPID
PrivateTmp=true

[Install]
WantedBy=multi-user.target

#刷新配置system目录
systemctl daemon-reload
#开启php开机自启动
systemctl enable php-fpm.service
#启动php服务
sudo systemctl start php-fpm.service
#停止php开机自启动
systemctl disable php-fpm.service
#停止php服务
sudo systemctl stop php-fpm.service
#重启php服务
sudo systemctl restart php-fpm.service
#查看服务当前状态
sudo systemctl status php-fpm.service
#查看所有已启动的服务
sudo systemctl list-units --type=service
#查看是否正确启动
sudo systemctl list-unit-files |grep php

#解决环境问题,可以在任意目录下执行php命令,如: php -v
ln -s /usr/local/php/bin/php /usr/sbin/php

#查看PHP版本
php -v
三、通过acme.sh签发SSL证书
具体参照本站《自动化部署免费SSL证书acme.sh使用图文教程》文章说明。
四、nginx配置并开启http/2、http/3
在nginx中设置HTTP/2和HTTP/3(QUIC)配置设计一些列的nginx.conf的参数配置,不赘述了,直接给一个网站的nginx.conf的配置文件,供大家参考。
注意:由于HTTP/3(QUIC)基于UDP协议,需要开启防火墙UDP 443端口的入站规则,否则无法生效。
#进入编辑nginx.conf
vi /usr/local/nginx/conf/nginx.conf
#nginx.conf全文如下:
#------------nginx.conf全文开始------------------------#
user nginx;
worker_processes auto; #默认值为1,太高主进程调度负担加大。针对双核CPU,建议设置为2或4,通常应该略少于CPU物理核心数,也可以使用auto自动获取
#pid logs/nginx.pid;
events {
worker_connections 4096; #设置单个工作进程最大连接数,默认1024。
accept_mutex on; #优化同一时刻只有一个请求而避免多个睡眠进程被唤醒的设置,on为防止被同时唤醒,默认为off,因此nginx刚安装完以后要进行适当的优化。
multi_accept on; #打开同时接受多个新网络连接请求的功能。
use epoll; #使用epoll事件驱动,因为epoll的性能相比其他事件驱动要好很多
}
http {
include mime.types;
default_type application/octet-stream;
client_max_body_size 1024M;
sendfile on;
keepalive_timeout 80;
##============配置本站未设置的域名解析IP的直接跳转============##
##配置,未配置的域名直接跳转到默认的域名站点
##使用 permanent 关键字将其标记为永久重定向
server {
listen 80 default_server;
listen 443 ssl default_server; #配置443要配套配置SSL证书
server_name _;
rewrite ^(.*) https://example.com permanent;
#SSL 证书位置配置
ssl_certificate /usr/local/ssl/example.com/fullchain.cer;
ssl_certificate_key /usr/local/ssl/example.com/example.com.key;
}
##============开始:HTTP server 配置,默认的80端口============##
server {
listen 80 ;
listen [::]:80 ipv6only=on;
##多个域名用空格间隔即可
server_name example.com example.com.cn;
charset utf-8;
location / {
root /usr/local/nginx/html;
index index.php index.shtml index.html index.htm;
ssi on; # 开启SSI支持
fancyindex on; # 开启Fancy Index目录索引
fancyindex_exact_size off; # 不使用精确大小.
fancyindex_header "/header.php"; # 头部文件
fancyindex_footer "/footer.php"; # 使用footer.html作为底部文件,没文件将会出现404错误,默认在当前目录下
fancyindex_localtime on; # [on | off]允许将文件时间显示为本地时间。默认值为“off”(GMT 时间)
fancyindex_hide_parent_dir off; # [on | off],是否隐藏返回上一级连接,默认off
fancyindex_time_format "%Y-%m-%d %H:%M"; # 用于时间戳的格式字符串,默认:"%Y-%b-%d %H:%M"
fancyindex_default_sort date_desc; # 排序,默认:name,可选项:[name | size | date | name_desc | size_desc | date_desc]
fancyindex_ignore inc favicon.ico sps; # 隐藏不显示的目录、文件
}
#配置支持PHP
location ~ \.php$ {
root /usr/local/nginx/html;
fastcgi_pass 127.0.0.1:9000;
fastcgi_index index.php;
fastcgi_param SCRIPT_FILENAME /usr/local/nginx/html$fastcgi_script_name;
include fastcgi_params;
}
error_page 403 /403.html;
error_page 404 /404.html;
error_page 500 502 503 504 /500.html;
}
##============结束:HTTP server 配置============##
##============开始:HTTPS server 配置============##
server {
#HTTP/2支持
listen 443 ssl http2;
listen [::]:443 ssl http2;
#开启Quic或HTTP/3支持,注意:reuseport参数只能配置一次,其他的server块只启用quic即可,即[listen 443 quic;]。
listen 443 quic reuseport;
listen [::]:443 quic reuseport;
#若无此行,HTTP3无法生效,其他server只用加这一行,不需要listen 443 quic reuseport;
add_header Alt-Svc 'h3=":443";ma=86400,quic=":443"; ma=2592000; v="46,43"';
#默认SSL配置,未配置server_name的也可以访问到的,多域名在共享一个证书
server_name example.com *.example.com example.com.cn *.example.com.cn example.cn *.example.cn;
charset utf-8;
ssl_protocols TLSv1.3 TLSv1.2;
#控制在发送数据时的 buffer 大小,默认设置是 16k。这个值越小,则延迟越小,而添加的报头之类会使 overhead 会变大,反之则延迟越大,overhead 越小。
ssl_buffer_size 4k;
##设置ssl session缓存(10m是指缓存大小10兆)
ssl_session_cache shared:SSL:10m;
##设置长连接缓存过期时间 30m 4h
ssl_session_timeout 30m;
ssl_prefer_server_ciphers on;
ssl_ciphers ECDHE-ECDSA-AES256-GCM-SHA384:ECDHE-RSA-AES256-GCM-SHA384:ECDHE-ECDSA-CHACHA20-POLY1305:ECDHE-RSA-CHACHA20-POLY1305:ECDHE-ECDSA-AES128-GCM-SHA256:ECDHE-RSA-AES128-GCM-SHA256:ECDHE-ECDSA-AES256-SHA384:ECDHE-RSA-AES256-SHA384:ECDHE-ECDSA-AES128-SHA256:ECDHE-RSA-AES128-SHA256;
#HTTP Strict Transport Security(通常简称为 HSTS)是一个安全功能,它告诉浏览器只能通过 HTTPS 访问当前资源,而不是 HTTP。
add_header Strict-Transport-Security "max-age=31536000";
location / {
root /usr/local/nginx/html;
index index.php index.shtml index.html index.htm;
ssi on; # 开启SSI支持
fancyindex on; # 开启Fancy Index目录索引
fancyindex_exact_size off; # 不使用精确大小.
fancyindex_header "/header.php"; # 头部文件
fancyindex_footer "/footer.php"; # 使用footer.html作为底部文件,没文件将会出现404错误,默认在当前目录下
fancyindex_localtime on; # [on | off]允许将文件时间显示为本地时间。默认值为“off”(GMT 时间)
fancyindex_hide_parent_dir off; # [on | off],是否隐藏返回上一级连接,默认off
fancyindex_time_format "%Y-%m-%d %H:%M"; # 用于时间戳的格式字符串,默认:"%Y-%b-%d %H:%M"
fancyindex_default_sort date_desc; # 排序,默认:name,可选项:[name | size | date | name_desc | size_desc | date_desc]
fancyindex_ignore inc favicon.ico sps; # 隐藏不显示的目录、文件
}
error_page 403 /403.html;
error_page 404 /404.html;
error_page 500 502 503 504 /500.html;
location ~ \.php$ {
root /usr/local/nginx/html;
fastcgi_pass 127.0.0.1:9000;
fastcgi_index index.php;
fastcgi_param SCRIPT_FILENAME /usr/local/nginx/html$fastcgi_script_name;
include fastcgi_params;
}
#SSL 证书位置配置
ssl_certificate /usr/local/ssl/example.com/fullchain.cer;
ssl_certificate_key /usr/local/ssl/example.com/example.com.key;
}
##============结束:HTTPS server 配置============##
}
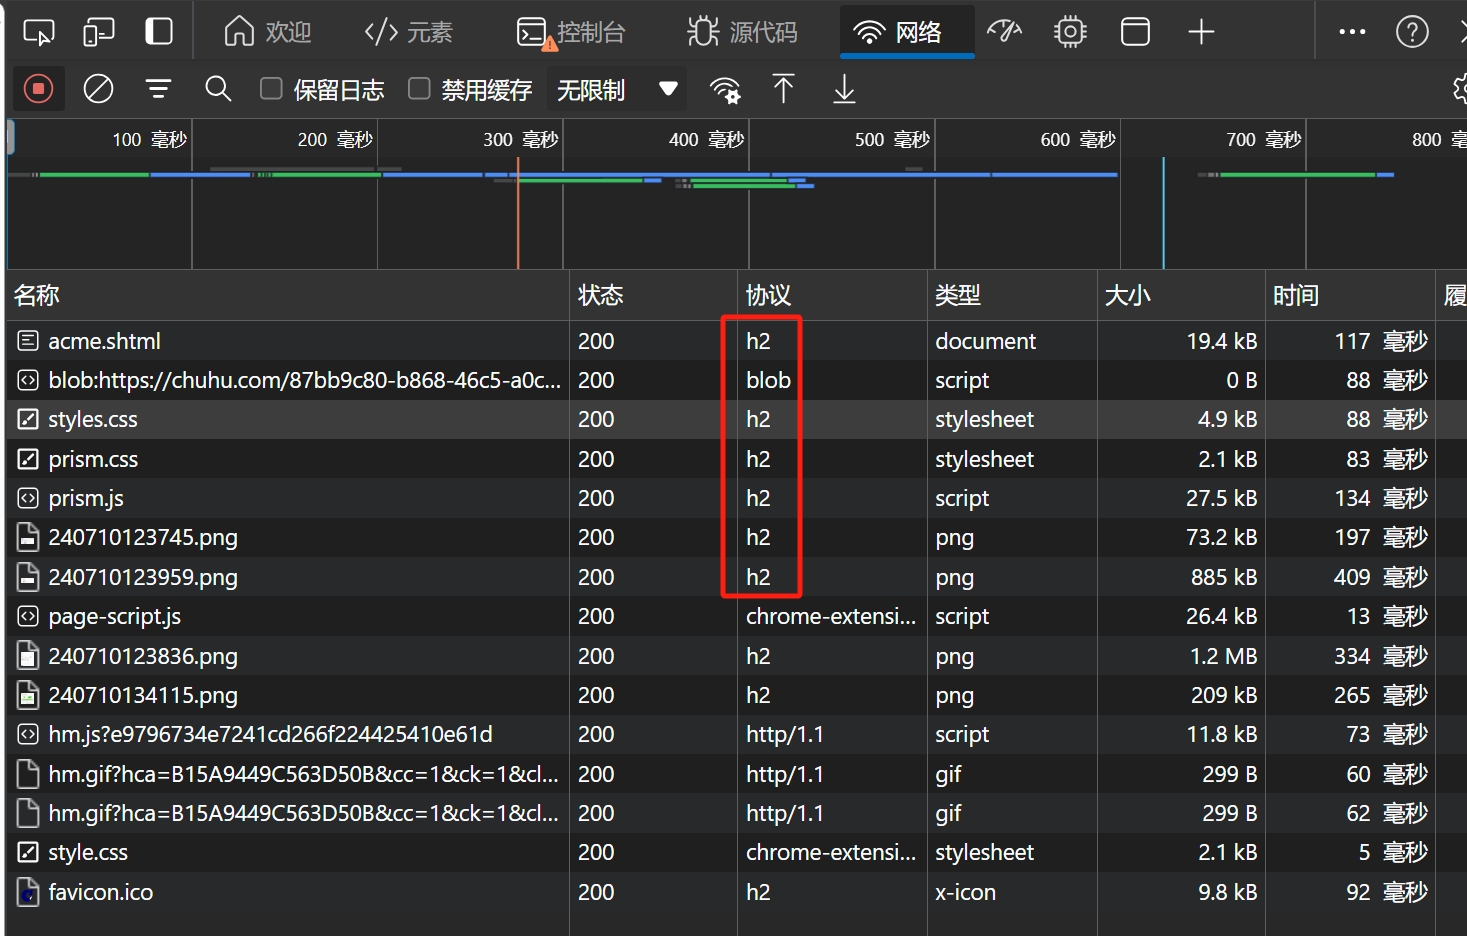
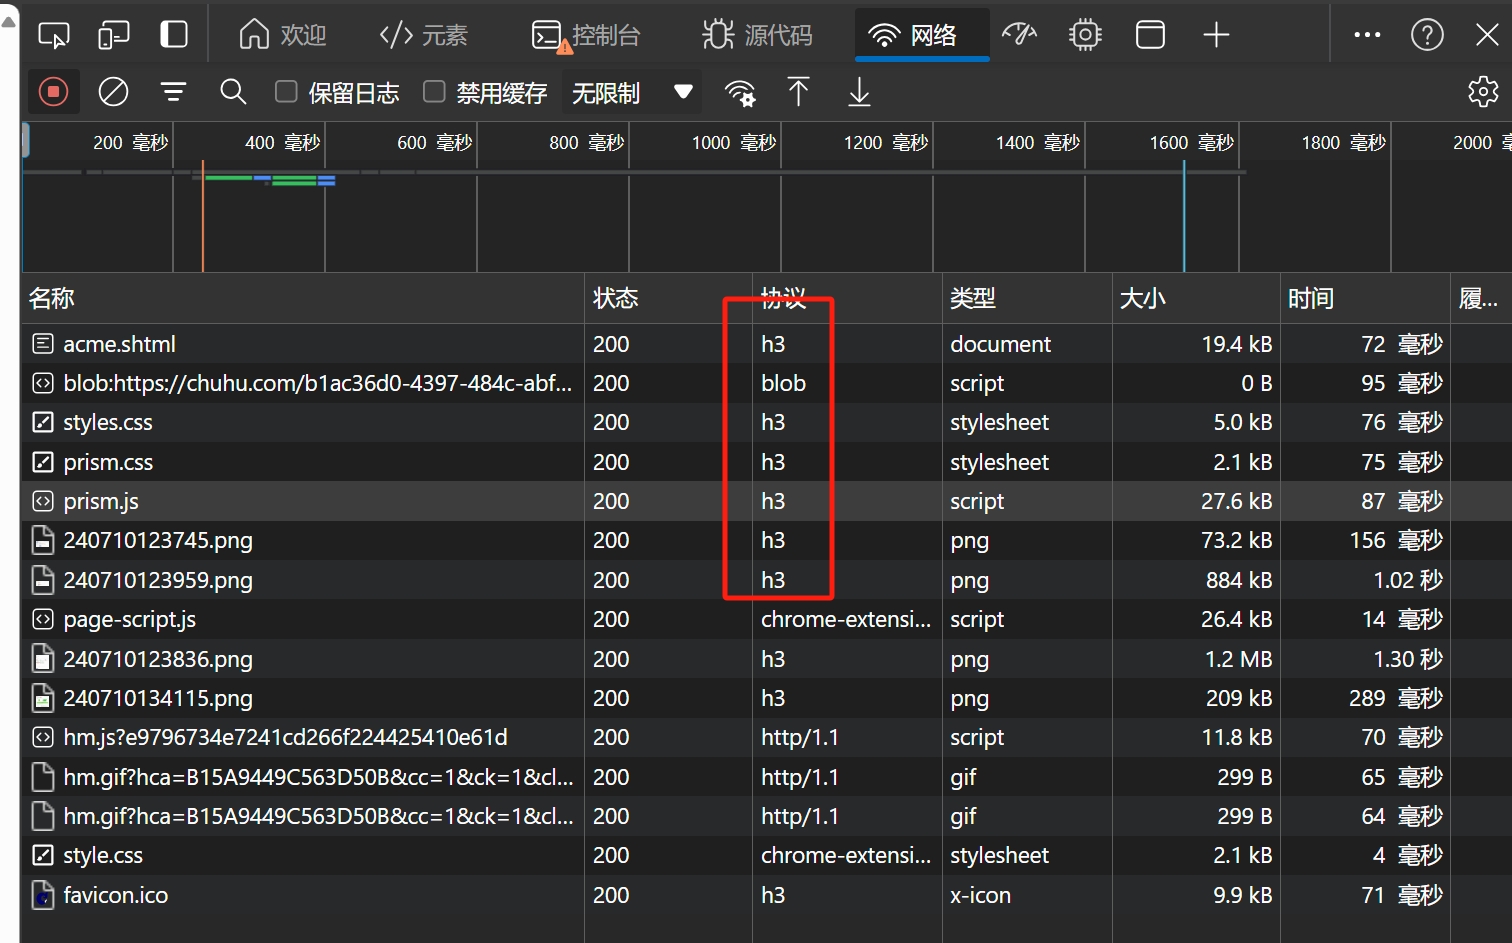
#------------nginx.conf全文结束------------------------# 配置完成后,重启nginx,访问站点,通过Edge浏览器或者Chrome的“开发人员工具”查看网络请求数据,可以在网络-协议栏看到是HTTP/2的是h2,HTTP/3是h3,如图示: